
Hubs are black magic to a lot of people. I know that when I started screwing around with bikes back in the pennyfarthing days, when your hubs were also your cranks, I was intimidated by the whole setup. In truth, they're actually pretty simple beasts.

Witchcraft, I know, right? Let's pull it apart and see what we've got.
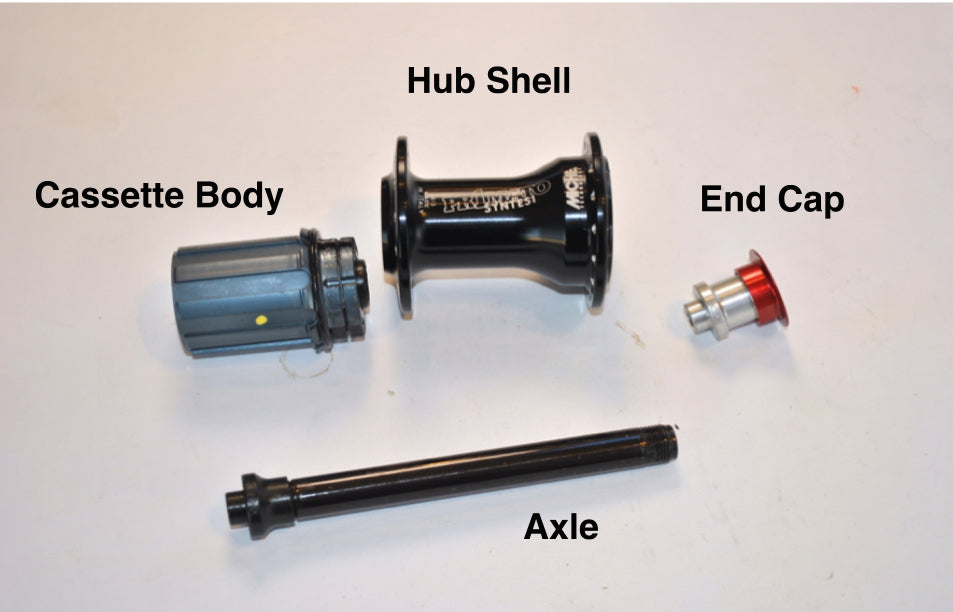
The hub shell is just a piece of aluminum (forged, then anodized and machined) that houses a few bearings and holds everything together. Apart from needing to be strong (the spokes anchor to it) and precise (the bearings get pressed into it, and the drive ring is in it), it's just a hunk of aluminum.
The cassette body holds the cassette, and the interplay between the cassette body and hub shell constitutes the transmission (next photo). When you coast, the pawls retract in against a spring, and the cassette body rolls against the drive ring of the hub shell. When you pedal, the springs pop the pawls out and engage them in the drive ring. That makes the bike go forward - the pawls are IMPORTANT little m-f'ers, as are their springs. No them, no go.

The pawls engage in the detents in the drive ring. This interaction is fairly important.
The axle and its end caps (sometimes both are removable, sometimes - as in this case - just one is) are how you attach the hub to the bike. The axle's other massively important job is to be the axis around which the bearings turn. A flexible axle is bad for wheel stiffness, and will cause premature bearing wear - it's generally bad for business.
Deconstructing this hub took some elaborate tools - two 5mm hexes. Most are similarly easy to pull apart, some even easier - you can pull a Powertap hub apart with your hands. A front hub is even simpler - it's just a hub shell, axle, bearings, and end caps.
Hub maintenance is simple, infrequent, and important. Once a year or so, depending on how much you ride and what conditions you ride in, pull things apart (take some phone pictures as you do it so you have an exact record of how everything goes back together), flush things out with WD-40 or some other super weak solvent (WD-40 works great - just use that), clean things off/out with a cotton rag and some Q-Tips and toothpicks, put some new lubricant in (check your hub maker's web site to see what to use - most are tolerant of a range of different stuff but some aren't), and close everything back up. If you're slow and deliberate, it might take a half hour to do both wheels.
Your service intervals will vary A LOT depending on your riding conditions. After the exceptionally muddy, nasty, and long Hampshire 100 this summer, I stripped and serviced a brand new set of hubs. Other times, I've gone a year between services and been totally fine.
2 comments
Sam – Thanks for the question. WI hubs are very easy to service. Take a 2mm hex and back out the three set screws in the pre-load adjust collar (accessed through the small hole in the non-drive side of the hub shell), pull the non-drive end cap out, et voila – you've now got a WI hub in the same state as the middle picture above. Be careful – there is a washer that sits against the drive side bearing in the hub shell – don't lose that. The only small wrinkle in re-assembly is loading the pre-load collar – it's not quite as easy as on the Miche hub. You need to find something to use to put pressure against that ring while you set the set screws. Drive sockets around 25mm (7/8", 1", 24mm – whatever you have) works great, a piece of 1" ID PVC works great, and there are a million other things you could use. Dave
Thanks for this straightforward breakdown. This certainly reveals the nature of most of the hubs I've worked with over the years…however…my new Rail 52's are built around White Industries hubs. Despite being a self-taught wrench of 30 years, I must admit I'm a bit intimidated by them. Judging from their online support docs, they aren't quite as straightforward. Would love if you could spend a little time on maintenance for those… Thanks again! Sam